Discussion
How to add a 'select all' functionality to the optimized table
The optimized table is the preferred approach for rendering read-only and editable tables. It has a lighter markup, is more accessible and has improved performance. Having said that it does not have all the functionality of the legacy table component. One of the most requested feature is the ability to select all the rows in a page. This functionality is particularly useful when you use paging and want to quickly select all the rows in the page before performing some actions.
Such functionality can be achieved by running some data transform on click of the checkbox header and then refreshing the list, but this is not the most efficient way, especially with columns that have a lot of columns. The most efficient way is to toggle each row of the table on the client side.
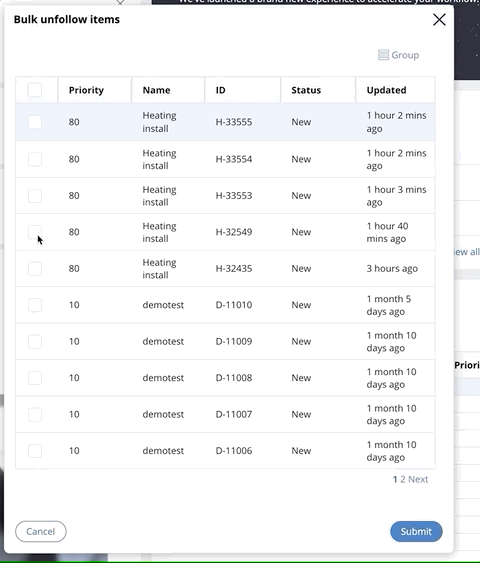
Here is a demo of the functionality for the bulk follow action running in a modal dialog
This document is going to explain how to implement such functionality with a little bit of custom javascript.
1/ Configure the optimized table to use an editable DP
Make sure that your optimize table is using an editable DP - For this example, we will use the data page called 'D_pxUnFollowCases' which is used to follow / unfollow cases.
Here is the configuration of this table using Theme-Cosmos
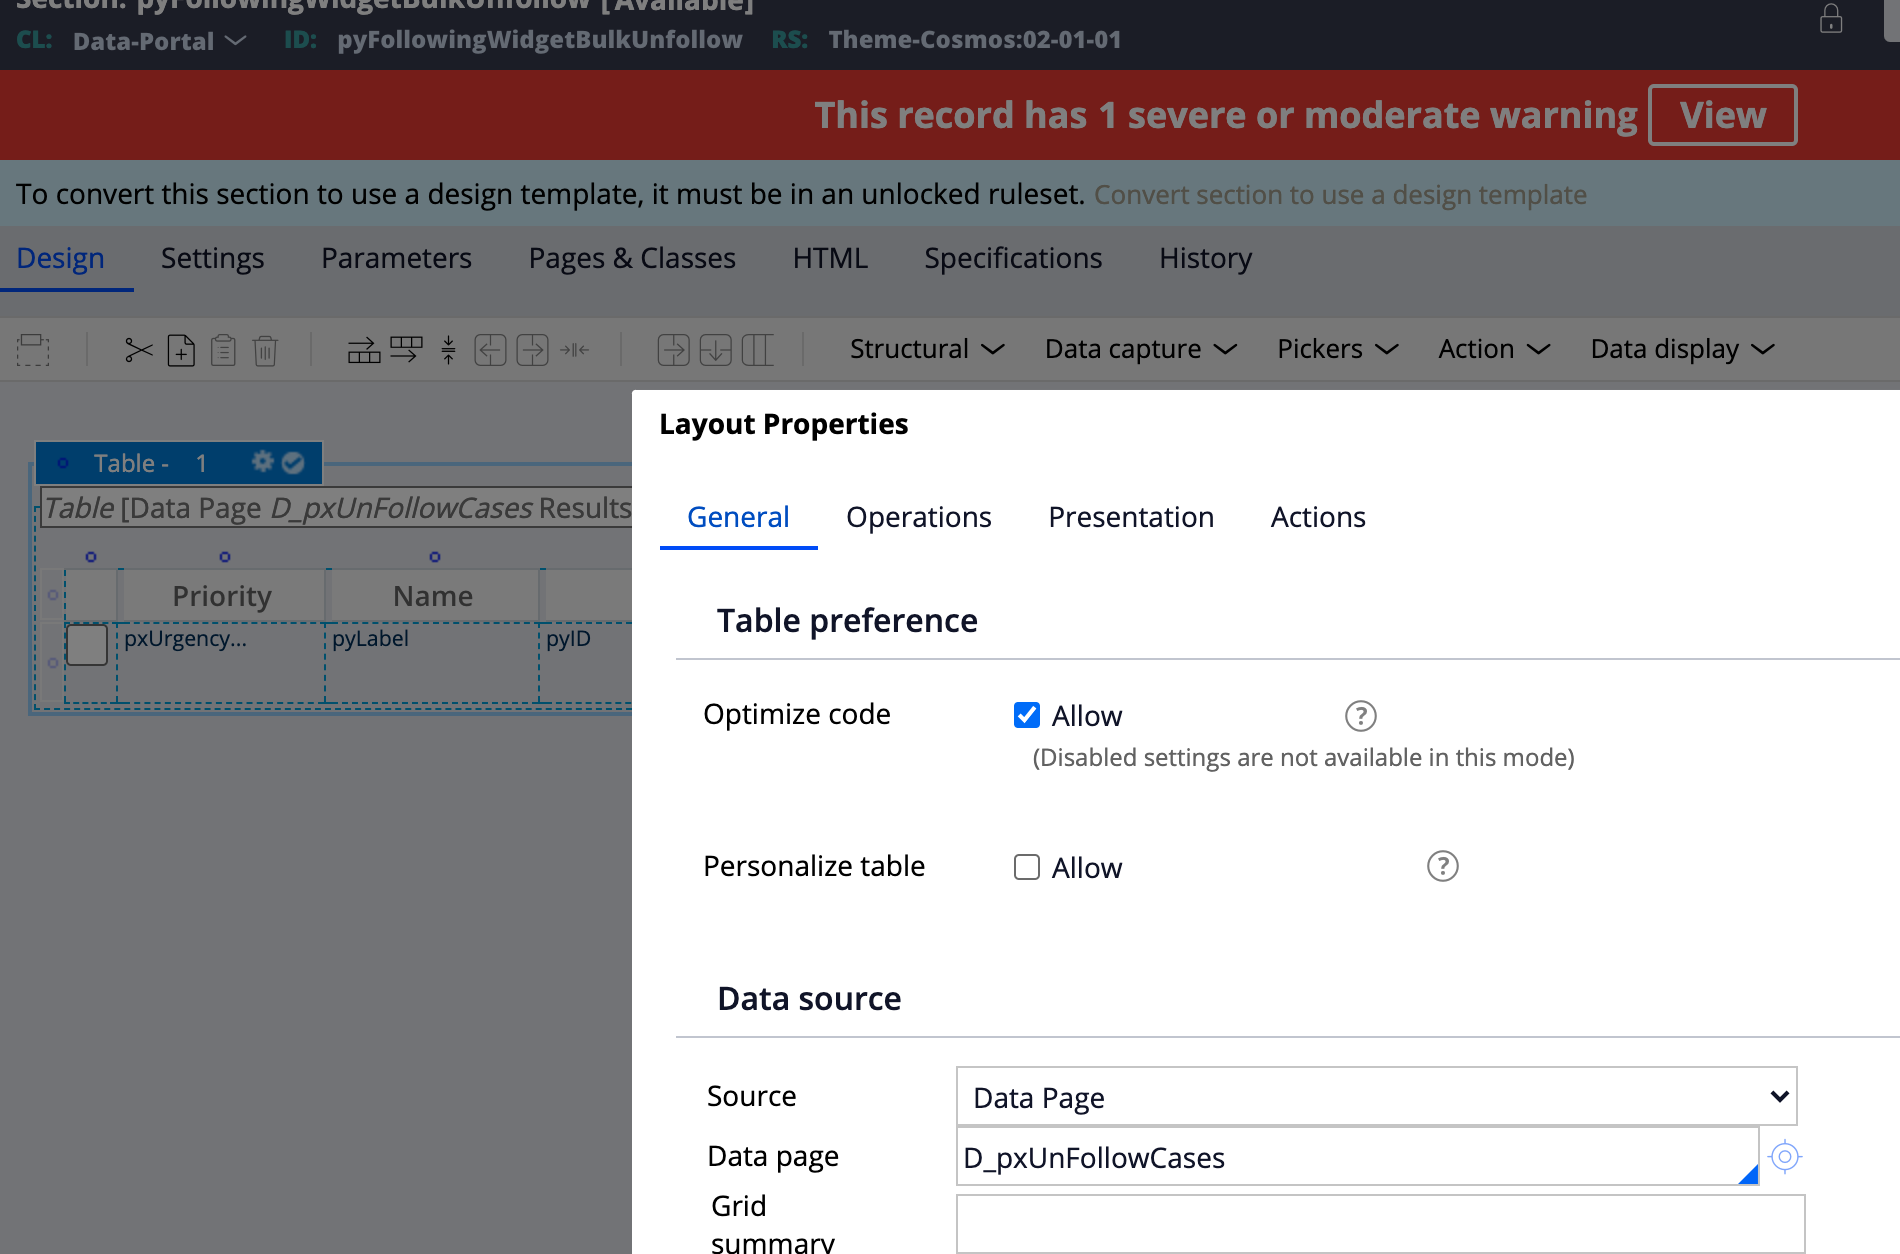
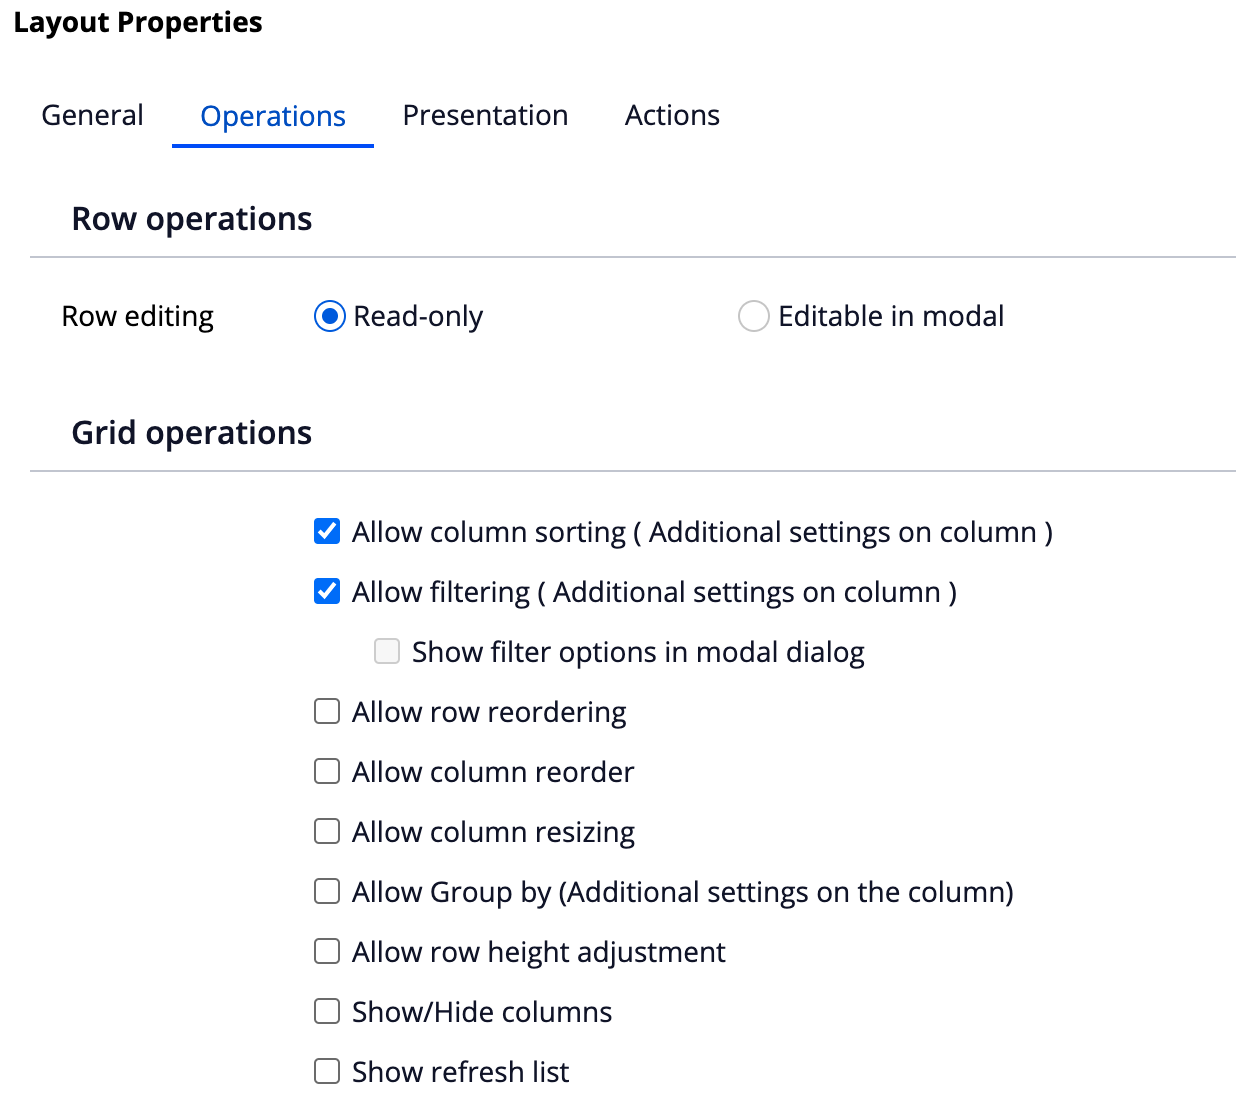
Make sure to disable column grouping in the 'presentation' tab for this functionality to work. The recommended settings would be:
2/ Add a checkbox on the first column
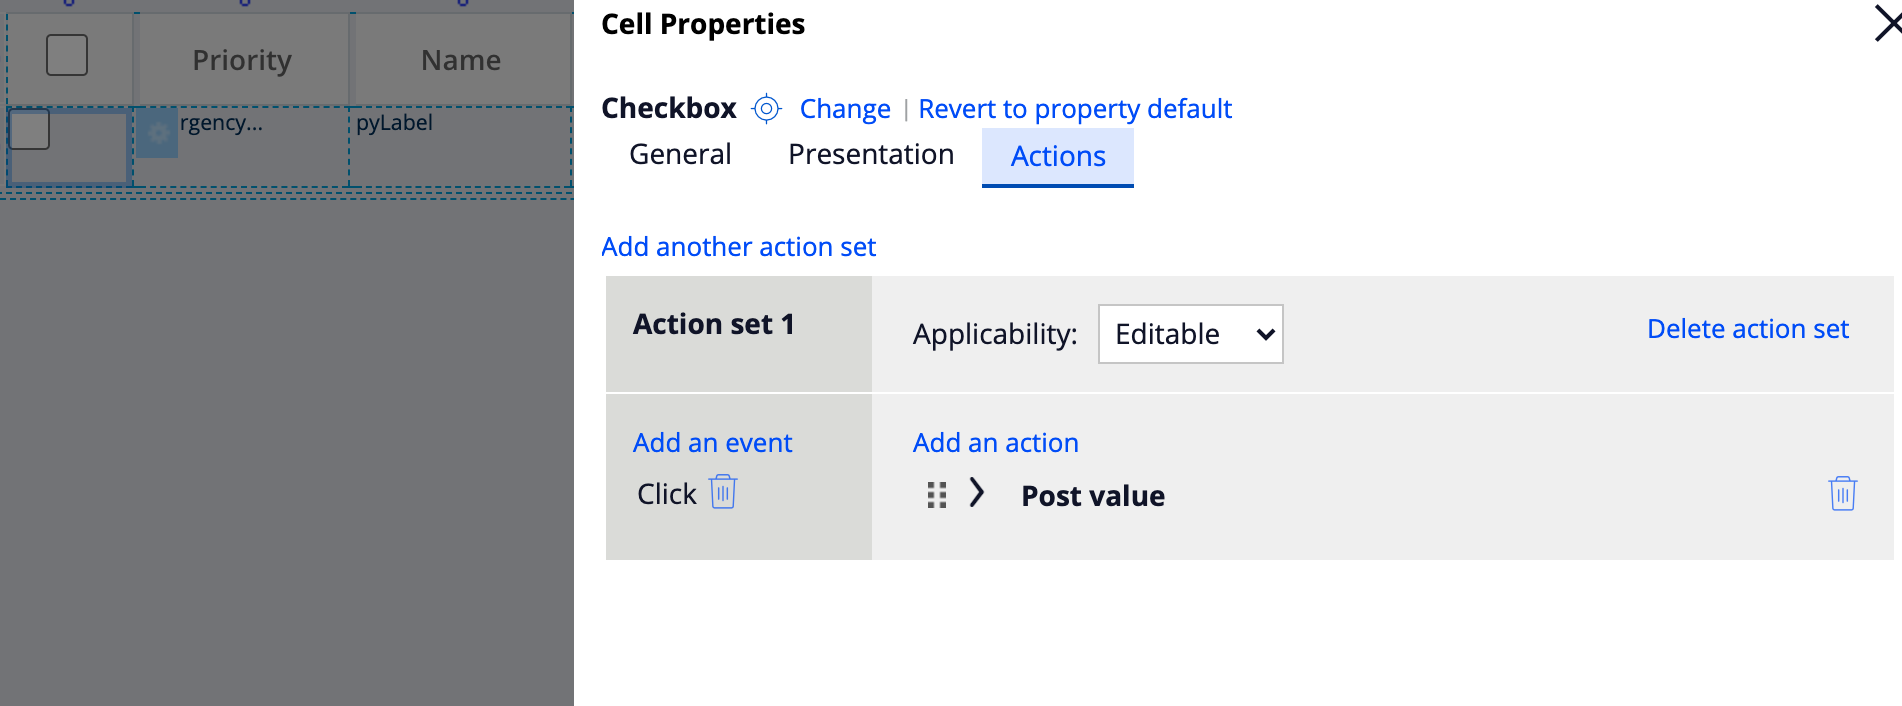
Add a checkbox using the .pySelected property and configure the click action to 'post value' - This will allow the setting to be persisted in the editable DP - If you do not configure the click action, the row selection will be lost when changing to the next page
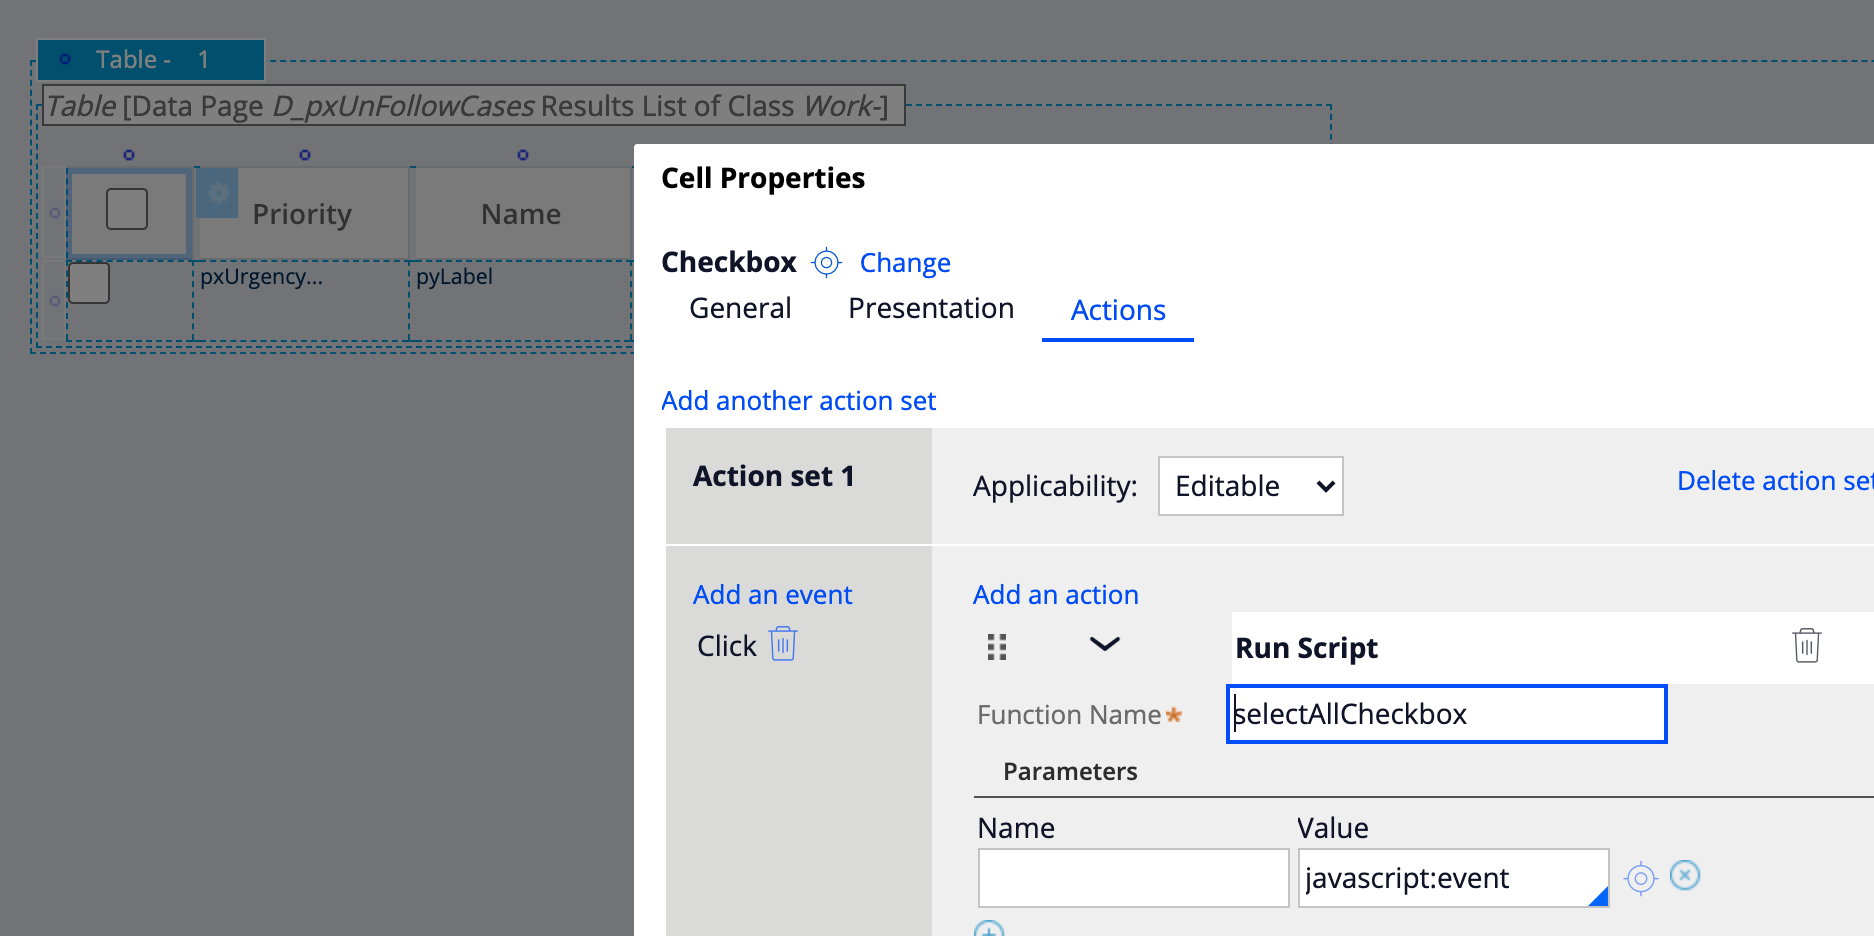
3/ Add a checkbox in the header of the first column
Add a checkbox in the header of the column - this will be used for the 'select all' action - on click, add a runscript action that will call a function called selectAllCheckbox.
Do not set a property on this checkbox so that there is nothing to be stored on the primary page. The 'select all' checkbox will act as a toggle but the state of the checkbox will not be persisted when navigating to a new page.
4/ Implement the function selectAllCheckbox
There are several ways to implement a JS function - the recommended approach is to create a new JS file and reference the file in your portal harness. If you want to get this function available everywhere, you can also load the JS file using the userworkform fragment.
For this document, we will implement directly the function in UserWorkform using the following snippet
<script>
function selectAllCheckbox(event) {
   var el = event.target;
   $(el).closest("table").find(".checkbox").each(function() {
      if(el !== $(this)[0] && $(this)[0].checked != el.checked) {
        pega.control.actionSequencer.fireTopPriorityEvent($(this)[0], "click")
      }
   });
}
</script>
The function will find all the checkbox visible in the table and trigger the click action on each individual checkbox. Note that if you have other checkboxes in the table, they might be triggered too - you will need to implement some additional filtering in the if condition above.
5/ Implement business logic for selected rows
If you are rendering the table in a modal dialog, the last step is to create a DT or activity and configure it in the post processing of the flow action - On submit of the modal, the pro-processing work will look for the rows with .pySelected set to true

Other functionality can be added like selecting multiple rows using the shift click action or being able to use the up and down arrow to quickly select or unselect all the rows.
For more details you can import the attached RAP on your Pega Platform dev sandbox and add the branch 'demoSelectAll' to your application. Then navigate to "Configure -> User interface -> Skins, interfaces and templates". The table that displays the list of templates will showcase this functionality. (Note that the branch has been created on a Pega 8.6 and might not work on older Pega version).
Here is a demo of the functionality
You can do this with OOTB.
Call a DT with Section refresh for Select All Check box. This will select all the rows, when select all is checked or true.
For each row check boxes, it will have same config as above. But this time, it will see IndexInPageList of False for the each check boxes. When any False is present, then select will be unchecked.
@RichardMarsot We have added checkbox in the header with no property reference. But in the output instead of checkbox it's showing as .pyTemplateCheckbox.
Could you please let me know how to show checkbox there?
Thanks
Saikat
@RichardMarsot even we are referring a property in the column header as control checkbox, it's showing the property name not the checkbox.
@RichardMarsot We have added one checkbox in the header of the first column, but in the portal it's coming as read-only though we have made it Editable in the Presentation tab of the Checkbox.
We are facing the same issue which is mentioned in the below:
Could you please help.
@RichardMarsot We have tried with setting the property to be editable always instead of auto but it's still showing as '.pyTemplateCheckBox', in our case harness is OOTB 'pyDashboard7'.
@RichardMarsot I see this post is tagged to 8.1 version. Ours is 8.1.1.
When we select Optimize table checkbox, under operations tab, we are not seeing the Column grouping related grid operation. Infact we see less no. of operations compared to what we see in the screenshot you attached.
Can you please let us know the complete table settings you used if the suggested approach is supposed to work in 8.1.1.
Thanks,
Dinesh
Hi Richard,
We have below requirement in our application.
Using select all check box in grid header to select only the records in first page instead of all the records.
We have followed above article and implemented the same in our application. As per the requirement we have enable the Optimize and Personalise options on the general tab of a table grid. We see below issues.
1. We can click on header check box in 1st page, All the 1st page records are selected but header check box is selected in all other pages also.
2. We can click on header check box in any page and switch between pages header check box is unselecting.
3. We can unselect any of the row level check box header check box is not unselecting.
Note: We have raised pega incident ticket for the same. Please find the below incident ticket for reference.
INC-172650
Thanks,
Anil
@Anil Kumar Borra this post is providing some examples on how to extend the functionality - it is not a released functionality and should be taken 'as is'.
1. This is not happening for me. it is likely because you are using a valid property for the header checkbox - keep the property as empty so that it does not get persisted in the DP on the server. it is not possible to have a different value of the header checkbox depending on the page - to achieve that you would need a pagelist with a row for each page. This structure is not present in the DP.
2. The checkbox in the header is really a toggle and is not persisted when navigating to pages.
3. more advanced functionality could be added to the checkbox header - for this demo, I purposely made is very simple to toggle on / off all the checkbox on the page.
@RichardMarsot - Is there a hard-set requirement to have an editable data page? I believe this is to be able to set the pySelected property.
Will this work if we have the optimized table sourced from a pagelist property? We should be able to set the pySelected on a pagelist property as well, correct?
@RichardMarsot Hi Richard,
We are in Pega 8.2.6, We see checkAllIfInHeader OOTB function in pzPega_ui_grid file.
Just having a checkbox in header cell(not needing any actions) and a checkbox in corresponding data cell (post action on change) we see "Select All" selecting rows of the page we are on. We are using unoptimized table.
However we have a requirement to select records across all pages of table on click of "Select All" checkbox in table header. For this we can't leverage client side selection as all rows of table are not in DOM with pagination. So we wan't to write our logic server side. So, we want to know how to stop the processing that checkAllIfInHeader does without stopping other event handlers.
@SaiDeepakA8265 simply do a run dataTransform or run Activity on the select all checkbox and iterate through the pageList on the server to set the pySelected to true. Also update the state of the UI to change each visible row checkbox to selected using the runscript above - The selected state for the other pages will come automatically when clicking on the next page.
@RichardMarsot Thanks for replying.
The problem is , when we select checkboxes in all rows of a single page it selects the checkbox in header, even though other pages have rows with unselected checkbox. That is done by code in checkAllIfInHeader, which runs for every checkbox click in table(rows/header).
@RichardMarsot Hi Richard, We have checkboxes in other columns. When we implement this on optimized table, the other column checkboxes are getting selected. Could you please advise how to avoid that?
@MadhaviK1891 as indicated in my post 'The function will find all the checkbox visible in the table and trigger the click action on each individual checkbox. Note that if you have other checkboxes in the table, they might be triggered too - you will need to implement some additional filtering in the if condition above.'
to filter, add a classname to the checkbox and look for $(this).className.contains("foo")
function selectAllCheckbox(event) {
var el = event.target; $(el).closest("table").find(".checkbox").each(function() {
if(el !== $(this)[0] && $(this)[0].checked != el.checked && <<<ADD FILTER>>>) {
pega.control.actionSequencer.fireTopPriorityEvent($(this)[0], "click")
}
});
}
@RichardMarsot Thanks Richard. We are able to fix the issue.
Hi Richard,
When we do select all and then deselect all there is a delay to deselect all checkboxes, There is nothing in the screen to indicate system is busy as well.
Is there any way to avoid this delay or make the user know system is busy.There are only 20 records in the page not sure why deselecting takes so much of time
@azildav8 it should not take a long time to select / unselect 20 rows - the video I recorded shows no performance issues
selecting all the rows with a pagination of 20 rows, will trigger 20 ajax requests - if each request takes a long time to process, this will add up
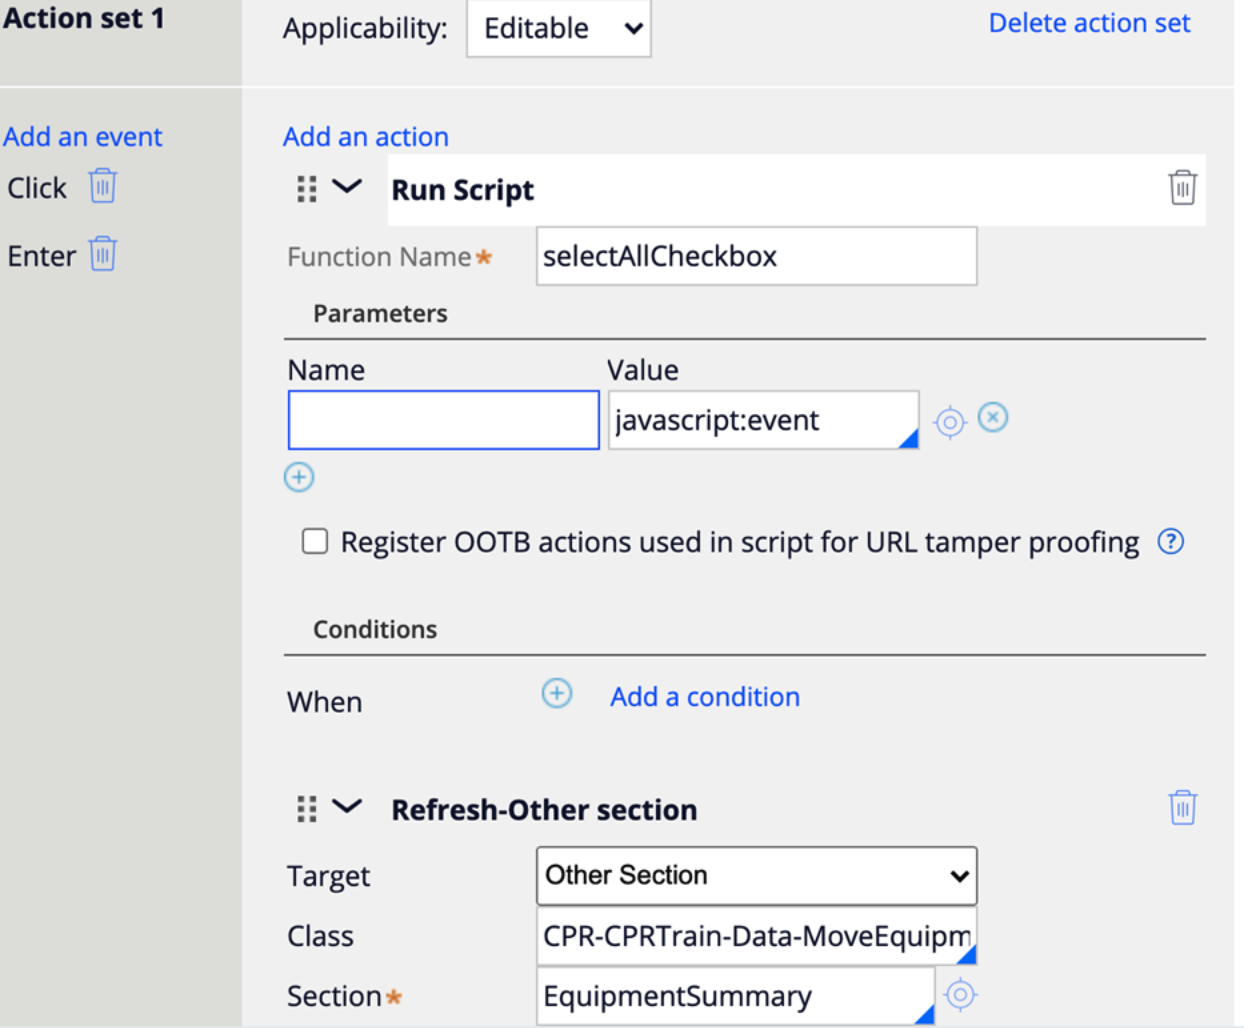
1/ Do not perform any other actions on each pySelected checked - only post value - doing refreshOther section will significantly after the performance since you will be refreshing the same section 20 times...
2/ if you need to refresh some section, then you should rewrite the JS function above to instead run activity on the server that will send the list of all the selected rows and update the pySelected property - Then perform the refresh section - this will reduce the number of Ajax request to one or 2.
Here is an example of JS updated function that will get all the rows selected and send them to an activity and then the refresh section - Note that this code is delivered 'as is' - please don't ask me for more questions on how to customize this further - the original post was to provide a quick and simple option to select all the rows in a table.
action set on the pySelectedAll checkbox (the one in the header for whole page selection)
@azildav8 it should not take a long time to select / unselect 20 rows - the video I recorded shows no performance issues
selecting all the rows with a pagination of 20 rows, will trigger 20 ajax requests - if each request takes a long time to process, this will add up
1/ Do not perform any other actions on each pySelected checked - only post value - doing refreshOther section will significantly after the performance since you will be refreshing the same section 20 times...
2/ if you need to refresh some section, then you should rewrite the JS function above to instead run activity on the server that will send the list of all the selected rows and update the pySelected property - Then perform the refresh section - this will reduce the number of Ajax request to one or 2.
Here is an example of JS updated function that will get all the rows selected and send them to an activity and then the refresh section - Note that this code is delivered 'as is' - please don't ask me for more questions on how to customize this further - the original post was to provide a quick and simple option to select all the rows in a table.
action set on the pySelectedAll checkbox (the one in the header for whole page selection)
optimized selectAll function to only perform one Ajax request to select all the rows
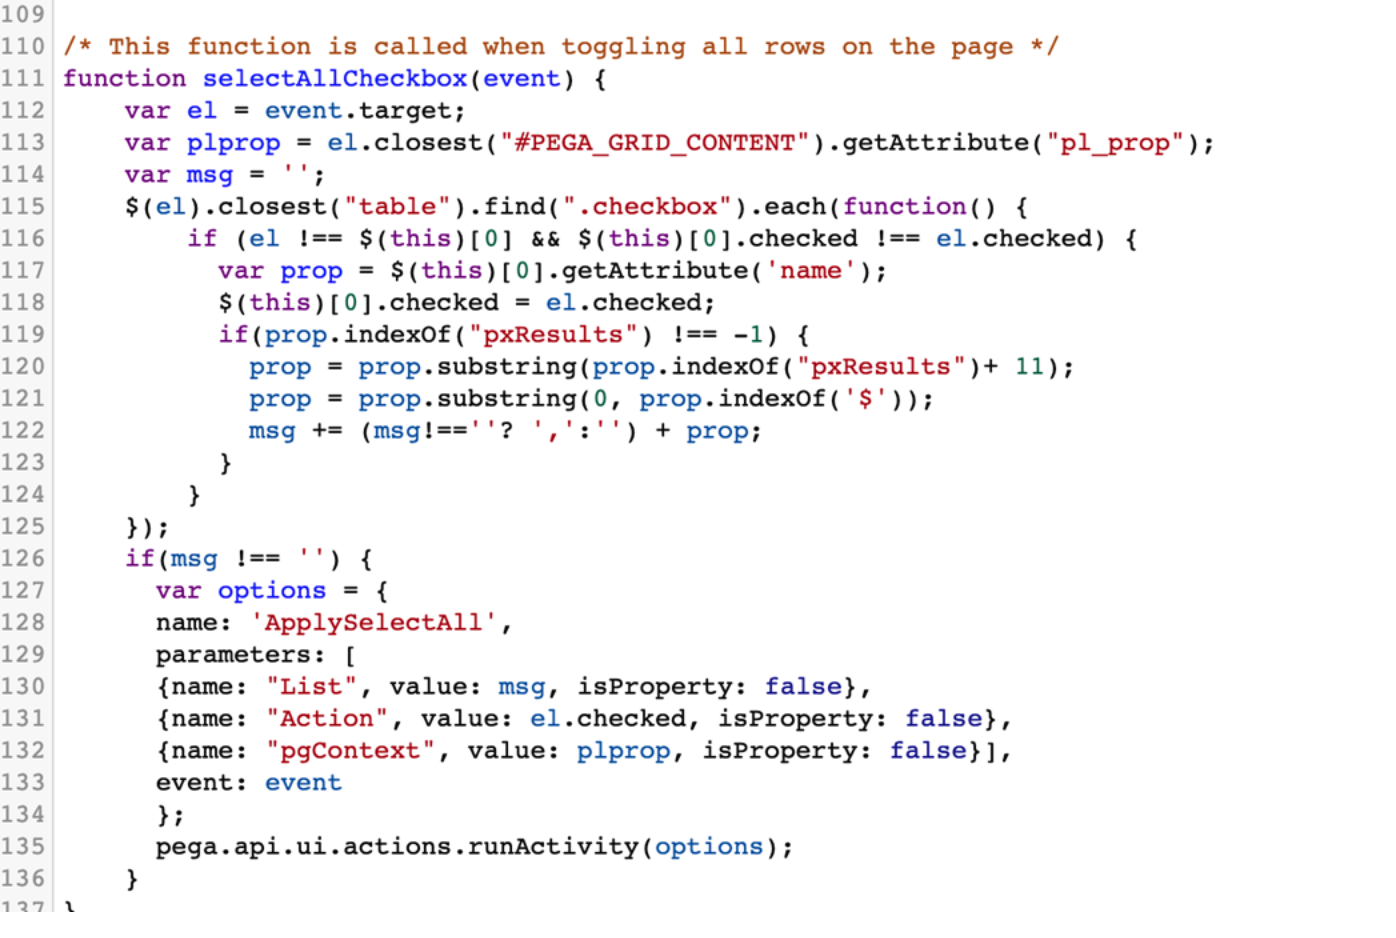
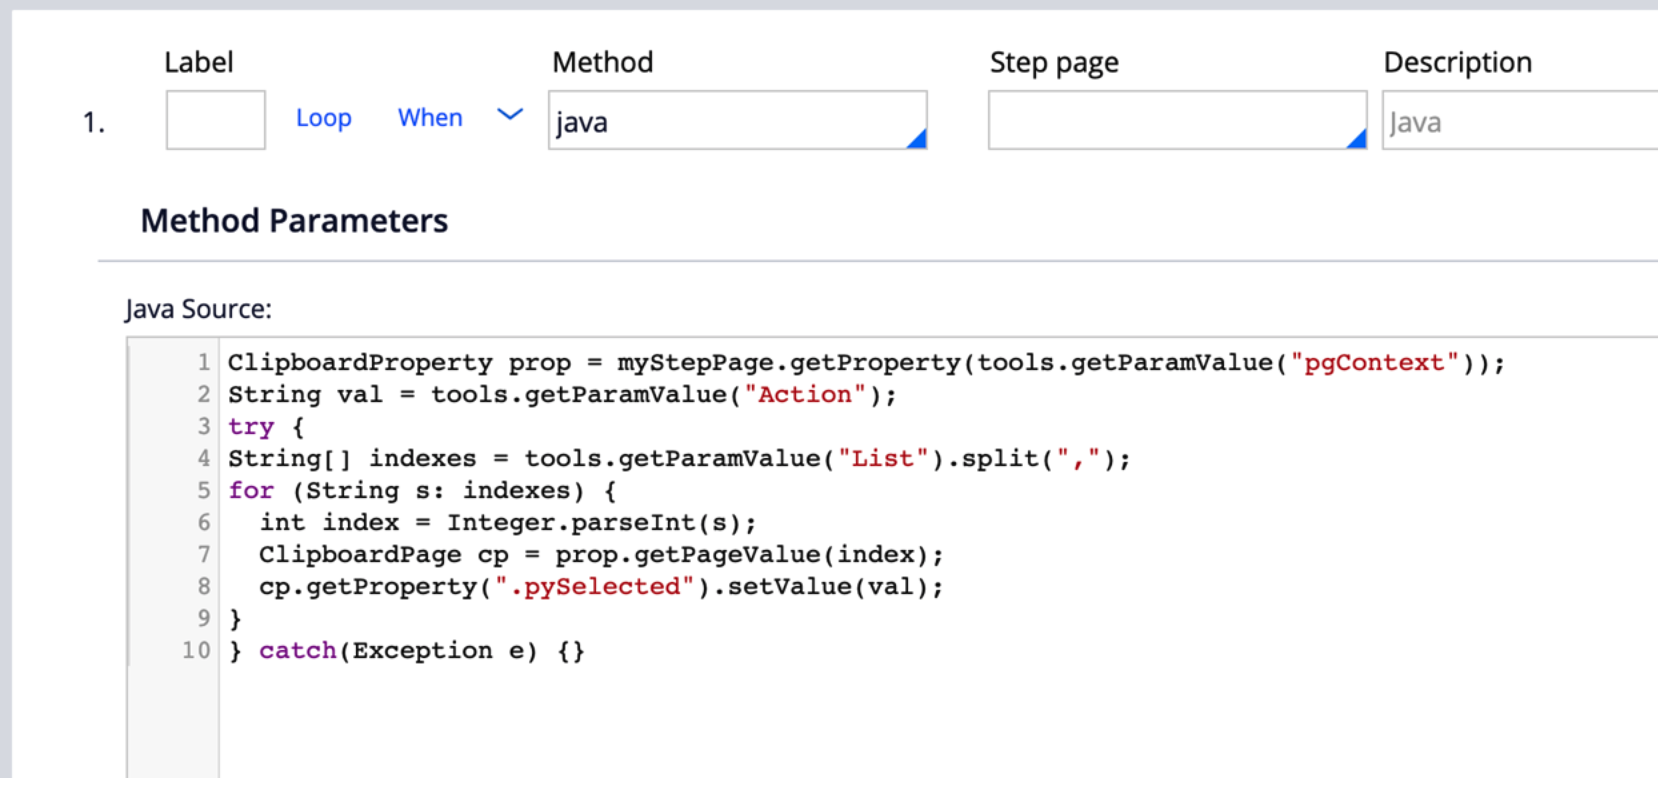
activity ApplySelectAll to update each row
@RichardMarsot Hi Richard, We suggested the client to follow this documentation to configure a "Select All" checkbox within their optimized table. They provided some feedback and were wondering if we can update the current fix to include deselecting all rows when unchecking the Column header checkbox. Would you be able to add this to the current JS code?
Thank you!
@lunammy previous reply already showcase the selectall and unselectall functionality - when calling the JS function SelectAllCheckbox, the state of the checkbox (selected or not) is passed in the 'action' parameter -on the server, the activity goes through all the rows and update pySelected based on the value of this action parameter.
@RichardMarsotThanks for this. I have a table where I want to show radio button in the column instead of the checkbox. In the Items shown in the table, I want only one row to be selected. Currently I can show a checkbox and make it work like a radio button by having a logic in action set. Is it possible to show the radio button directly?
@GaneshKumarC16656090 this is feasible but not really related to this post - this post is about adding 'select all' functionality which means that you can select multiple rows - if you want to have a single row selection - you will have to deal with unselecting the row - this is also better done in JS rather that doing it on the server side. I don't want to confuse other people by extending this post - this is a separate use case and should be its own article - the JS code would be different too
@RichardMarsot Thanks Richard. I agree its a separate topic and I have created a new question on this. When you have a time, please check
https://support.pega.com/question/radio-button-selection-table